Inspire provides built-in dashboards for you to utilize, but you can also create new dashboards with the widgets you need. Follow this article to get an overview of building a dashboard in Inspire.
Building a Dashboard
1. Click the Modules ![]() menu and select Dashboards.
menu and select Dashboards.
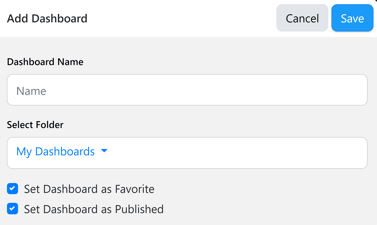
2. Select the +Dashboard  button, then enter your dashboard name.
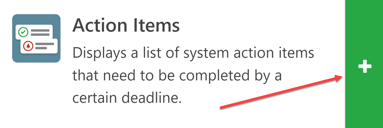
3. Add any desired widgets to your dashboard by clicking the add to dashboard button.
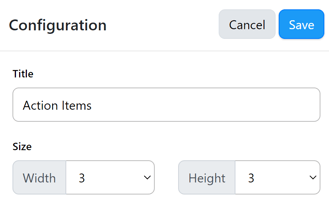
4. Optionally rename your widget and set the widget's size, then click Save. If you are embedding Office 365 content in your dashboard, more information is available in the next section.
Note: Once a widget is added, adjust the placement on the dashboard by dragging and dropping the widget to your desired location.
5. When you are done adding widgets and adjusting the layout, click Done editing this dashboard at the top of the page.
Widgets to add to a Dashboard:
Action Items: Displays a list of system action items that need to be completed by a certain deadline. https://help.inspiresoftware.com/en/actions-widget
Check-In Status: Quickly access metrics on check-ins for your team or across the organization. https://help.inspiresoftware.com/en/check-in-status-widget
Corporate Strategy Timeline: Displays the progress of your corporate objectives and key results in a selected corporate strategy. https://help.inspiresoftware.com/en/corporate-strategy-timeline-widget
Daily Calendar- Displays your daily calendar to see your scheduled meetings and tasks https://help.inspiresoftware.com/en/daily-calendar-widget
Direct Reports- View all your direct reports along with their planning and 1-1 status https://help.inspiresoftware.com/en/direct-reports-widget
Embed Web Content- Get and embed web content to a dashboard. https://help.inspiresoftware.com/en/embed-web-content-in-inspire-dashboards
Feedback- Request and review feedback from your supervisor and peers https://help.inspiresoftware.com/en/feedback-widget
Image Viewer- Link custom images to display on your dashboard
Inspire Report- Embed any of the reports in the Inspire Report module.
Learning- Access and launch your most recent trainings https://help.inspiresoftware.com/en/learning-widget
Links- Display a custom list of favortie links to your dashboard for quick access
Markdown- Displays custom output using the 'Markdown' syntax
Newsfeed- A roll-up of public objectives within your company https://help.inspiresoftware.com/en/newsfeed-widget
Notes- Quickly enter notes that are stored within the dashboard widget for reference
Notifications- Displays a list of system notifications to keep you up-to-date on what is happening within Inspire
OKR Progress - View the progress of personal, team or company OKRs.
Objective Activity- Access progress and status for all your objectives
Objectives I follow- A roll-up of the objectives you are following based on current status and progress updates. https://help.inspiresoftware.com/en/faq-favorite-vs.-following-objectives
Quicklinks- Setup and access your most used links quickly to speed up your workflow. https://help.inspiresoftware.com/en/quicklinks-widget
Quotes- Displays your custom quote slide show based on selected categories.
Recognition- View, give and recieve real time recognition. https://help.inspiresoftware.com/en/recognition-widget
Role Activity- Access status for all your roles. https://help.inspiresoftware.com/en/adding-a-new-role
Slideshow- Displays your custom images and descriptions on your objectives, roles and values.
Spacer- Organize your dashboards with spacers to customize placement of widgets.
Strategy Narrative- Create a narrative of the Corporate Strategy progress over a period of time. https://help.inspiresoftware.com/en/inspires-strategy-narrative
Task List- An interactive display of your task list.
Team OKR Alignment- Displays the progress of team key results in a selected corporate strategy.