Configuring Office 365 Integration (Admin Only)
This article provides an overview of the Office 365 integration process. These steps should be completed by your organization's Inspire Administrator with the assistance of an Azure Active Directory Administrator.
There are two steps in the process:
- Locating the Tenant ID and emailing your Client Success Representative.
- Granting permission for the Inspire application on behalf of your organization.
Obtaining the Azure Active Directory Tenant ID.
In this step, the Tenant ID is emailed to your Inspire Client Success Representative.
- Login to the Azure Portal.
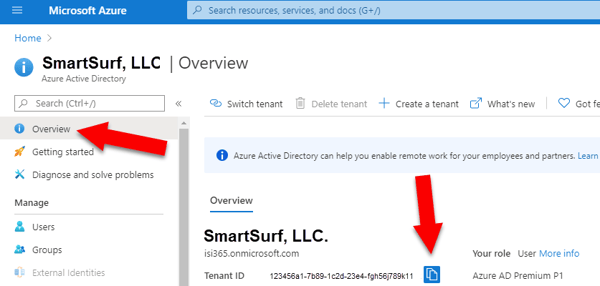
- Navigate to the Azure Active Directory.
- Select the Overview tab and then click the Clipboard icon to record the Tenant ID.

- Paste the Tenant ID into an email and send it to your Inspire Client Success Representative.
Application Permission
In this step, the Azure Active Directory Administrator navigates to the Inspire consent URL and walks through the steps to provide consent on behalf of the organization.
NOTE: For more information on Office 365 Consent Permissions, please view Explanation of Office 365 Consent Permissions for Inspire.
1. Navigate to https://app.inspiresoftware.com/login.html#consent
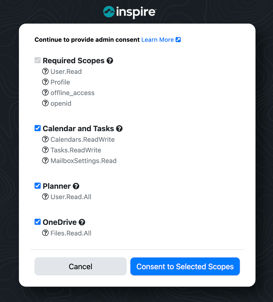
2. The Continue to provide admin consent prompt appears. Click Consent to Selected Scopes.

3. Sign in using your Microsoft Entra ID account (Formerly Azure Active Directory).
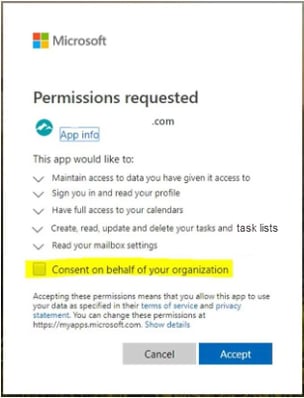
4. When the Permissions requested prompt appears, select Consent on behalf of your organization and click Accept. This will disable the prompt for all other Inspire users, and allow them to log in directly.

4. The Office 365 integration is now complete.