Creating a New Dashboard
You can create new personal dashboards or, if you are a Dashboard Administrator, you can also create new company-wide dashboards.
Inspire provides built-in dashboards for you to utilize, but you can also create new additional dashboards. This article discusses how to create both personal and company-wide dashboards.
NOTE: You must have the Dashboard Administrator permission to create and edit Company Dashboards.
To add a new dashboard
1. On the top toolbar, click the Modules ![]() menu and select Dashboards.
menu and select Dashboards.
2. Click the + New  button on the Dashboards Favorites bar.
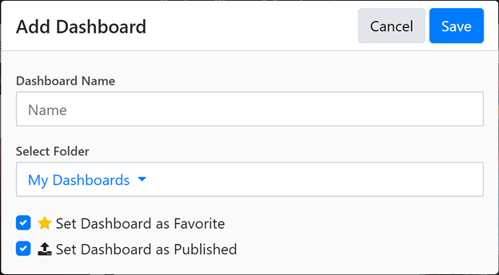
3. In the Dashboard Name field, enter a dashboard name.
4. Select a folder. If you select My Dashboards, the dashboard will remain private. If you are a Dashboard Administrator you can also see Company Dashboards as an option. If you select Company Dashboards, the dashboard will be visible to your organization.

5. Click the Favorite box to add the dashboard to the Dashboard Favorites bar.
6. If you selected Company Dashboards, click Publish to make the dashboard visible to users. To control who can see the company dashboard, please see Setting the Visibility for a Company Dashboard.
7. Click the Save  button.
NOTE: For details on editing your dashboard and adding widgets, please refer to Editing Your Dashboard and Widgets and Adding Widgets to your Dashboard.